DOF and Bokeh - Explained
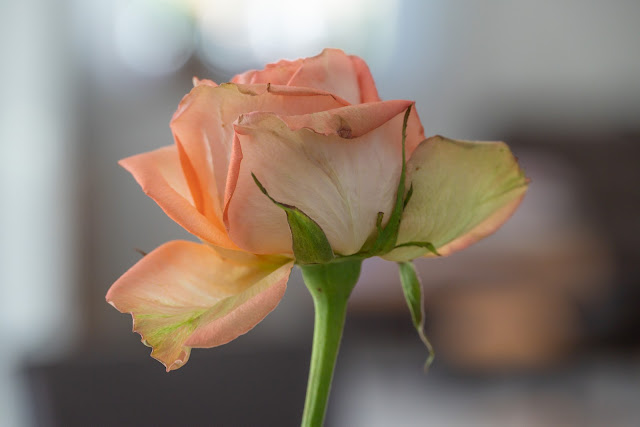 |
| F=6.3, L=145mm, D=1m |
DOF stands for "depth of field". It is the maximal minus the minimal distance where an image is acceptably sharp.
Bokeh is a word for the smoothness and blurriness of the background. We include also other details of the way that this blurriness looks into the concept of good Bokeh, like roundness and smooth light falloff of light specks. For a start, a creamy background is desired to make the subject stand out.
The picture above demonstrates both concepts. The DOF is large enough to cover much of the rose. But on the back and on the front of the flower, some blurriness can clearly be detected. I estimate the DOF to about 2cm. The background is creamy and blurry. You can see individual spotlights on the top. Such small, well-defined points of light become circles. In fact, each point in the background becomes a circle of diffusion. The small white points at the upper edge of the image just show these circles more clearly.
We need a bit of math to understand the effects of DOF and Bokeh. A point in infinity sends out light into the lens which is not focussed on the sensor plane, but spread out into a circle. The formula for the diameter of this circle of diffusion of a point at infinity is simply
r = L² / (D-L)F
Here, L is the focal length, D is the focussed distance and F the F-stop of the aperture. While the formula is the same for all sensors, it has different effects depending on the sensor size. For other sensors, we can use the "full frame equivalent" focal length and F-stop. Just multiply your focal length and F-stop with the crop factor to compare a camera with a "crop factor" to a "full frame" camera. The images on this page are taken on the Nikon Z5, a 36x24mm sensor.
You can derive an approximation for the size of the Bokeh balls at infinity in percentage of the sensor diagonal.
Bokeh = L² / (200 FD)
Here, L is in millimeter. It has to be entered full frame equivalent, as well as the F-stop F. The distance D is in meter.
You can find a DOF calculator on Photopills. For the math, see my EMT notebook. It does also contain a DOF calculator, which includes hyperfocal distance and size of Bokeh.
A quick computation for the image above shows that the diameters of the circles of diffusion are about 1/6 of the sensor diameter. This agrees to the optical impression of the background in the image.
The following formula for the DOF in front of the focussed subject is only an approximation, valid for small values of DOF and larger distances.
DOF ~= a FD² / L²
The factor "a" depends on your individual level of accepted blurriness.
Actually, we prefer not to use the formulas for actual computations. We use them to see what happens if we change one factor in relation to another one. This is best illustrated by examples.
Portraits
 |
| F=6.3, L=130mm, D=2m |
As a guideline, here are the values for a portrait of the upper body.
- L=100mm, F=4.0, D=2m.
- The Bokeh will be about 6% of the image. That is creamy.
- The DOF will be around 10cm, 5cm before and 5cm behind the subject.
Now, let us change some parameters to see how the formula can be used.
- We could use a 50mm instead (2x shorter). For the same image, we need to get closer and only have D=1m object distance (2x closer). This means that L/D is constant if we want the same angle of view. We get approximately the same DOF. The person will be a bit more distorted, but the image will show the same length of the body. We will see twice more of the background, however, making it more distracting. Moreover, the Bokeh will get half as good because the remaining factor L/F is half as big (remember that L/D is constant). To get the same Bokeh (but still more background), you need F=2.0, losing DOF. Long lenses are preferred for portrait.
- We could use a 35mm (3x shorter), stay at 2m, get a full person shot, and use F=8.0 (2x closer aperture). The DOF will increase considerably, getting the person and its surrounding in focus. The circles of diffusion in the Bokeh will be 18 times smaller, and the surrounding of the subject and background will easily be recognizable. Use this, if you want to show more.
- We could use a 200mm lens and get a headshot instead, keeping D=2m. This will reduce the DOF to only 2cm. You can counter by setting F=16.0, getting the same DOF again. The Bokeh will be the same again. The longer the lens and the closer you get, the less DOF and the more Bokeh you get because you cannot increase the F-stop beyond F16. The extreme is a macro shot.
- We could use another camera, let's say an MFT (micro four thirds) camera with a "crop factor" of 2. To get the same image as above, you simply take a 50mm lens at F2.0. As long, as you can compensate by wider apertures, you can get exactly the same result as on a full frame camera. The faster lens also helps to compensate the higher noise on MFT cameras, since you can take less ISO, often even a longer shutter speed due to the better image stabilization.
- To compensate a 85mm lens at F2.0 on a full frame camera using MFT, you can take a longer lens, like a 85mm on MFT (170mm equivalent) at F4, to get the same Bokeh and double DOF. You will have to back off from the subject, of course.
Landscapes
 |
| F=11.0, L=28mm, D=20m |
This is the opposite to portraits. We usually want everything acceptably sharp. The term to know is "hyperfocal distance". This is the closest distance D we can focus on and still get DOF to infinity. Here is a guideline which I use and remember.
- L=50mm, F=8.0, D=10m.
- Everything will be reasonably sharp from 5m (half of D) to infinity.
- In its recommendations, Nikon uses this relaxed hyperfocal distance of D=10m. But I find this not sharp enough for modern sensors, and prefer to compute with D=20m.
A good approximation for the hyperfocal distance is
D=L² / (30F)
Here, L is the full frame equivalent focal length in millimeter, and F is the full frame equivalent F-stop.
You can use the formula for the circle of diffusion above to transfer this to other situations.
- Using a 35mm lens, L² is half as big. So, you can focus to half the distance, i,e., to D=5m, getting everything sharp from 2.5m to infinity.
- Obviously, F=16.0 is another option. Your lens will start to get less sharp due to diffraction. Combining with 35mm, you get about D=5m and everything sharp from about 2.50m to infinity.
Street and People
 |
| F=4.0, L=50mm, D=15m |
This genre is between landscape and portrait and requires most care. The lenses range between 35mm and 70mm with 50mm the most common one. Since the situation changes all the time, you will have to make compromises if you want a quick setup. I use two different user modes that can be easily switched on the Z5.
User mode 1:
- Set this user mode to F8.0, assuming a 50mm lens. This is for images where you want to get much DOF.
- The lens will be reasonably sharp, and usually, you get enough DOF. In case of a 35mm, you can switch to F4.0 to get the same effects. But I use my 50mm for streets most of the time.
- For a small group of people, focussed to 5m, you get around 4m to 9m in reasonable focus. Focus to the second row. You will not get very blurry backgrounds this way. Step back for larger groups with the 50mm lens. You get even less blurry background. So make sure that it is not distracting.
- For a street scene, focus on something at around 10m. You get reasonable sharpness across the scene.
- For a single person at close distance like 1,50m, you get quite a good background, which will still be very recognizable, however.
User mode 2:
- Set this user mode to F4.0 or wider. This is for images where you want your subject to stand out from the background.
- You need to focus closer than 5m for the background blur to work.
- Above 10m, the blur will be much less visible, like in the image above.
In low light, you will take a much wider aperture, more than F2.8. You should plan for images with little DOF and much Bokeh. Alternatively, place the subject parallel to the sensor or further away if you want to get much sharpness. Also, be aware that your lens is sharpest in the center. You can plan to crop the image later to get your subject off-center.
So much for now. It is difficult, and I keep fighting all the time, sometimes with disappointing results. But I am always grateful for all the opportunities that modern technology allows me to use. You cannot be grateful and frustrated at the same time. In the past, it was just "F8 and hope" most of the time.
Comments
Post a Comment